Block Locking, Post Templates, & AllowedBlocks: Exercising Layout Control in Gutenberg
In the classic way of WordPress theming, it was straightforward to lock down layouts and offer clients a path to easily modify their WordPress content via custom fields without also turning over much of the reins on appearance. Some flexibility could be baked in by using something like the ACF Flexible Content field, but the leap from that level of flexibility to Gutenberg’s blocks was a big one for many to make. There are still people hesitant to make the change due to an opposition for handing over that level of control. With full-site editing themes further tipping the scales towards everything being controllable through the editor, this is clearly the direction WordPress is moving, though.
For those with clients who need more guardrails, is WordPress still a viable path given this? Yes! The block editor actually provides quite a few options to lock things down so let’s explore what you can use in your block-based builds to exert more control, if needed.
Block Locking
Purpose: Restricting moving or deleting blocks
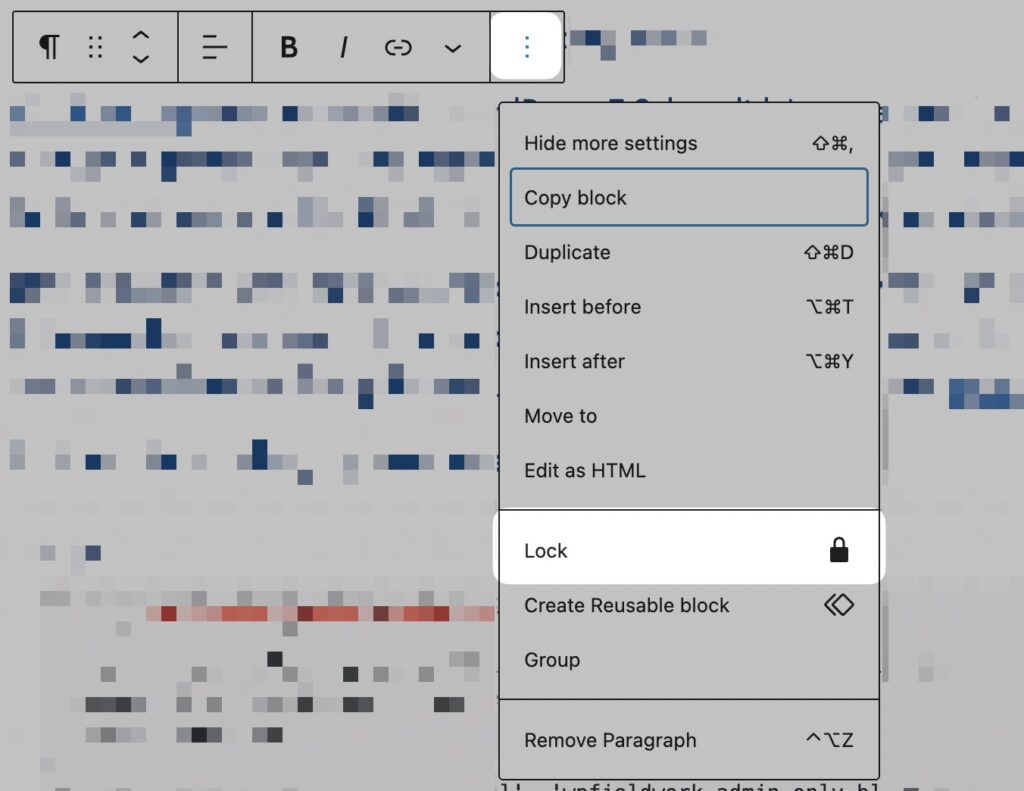
Block locking was released in WordPress 5.9, but didn’t get a visual user interface until WordPress 6.0. Block locking provides a route to prevent backend users from being able to remove and/or move any specific block. It’s comparable to locking layers in design programs. If a block can be locked, you’ll see a lock icon under Options in the block toolbar.
One important note with block locking, though, is any user with edit access can lock and unlock blocks by default. However, it is possible to restrict block locking further to only a certain user level, such as admins, or even only a certain user ID. You can do this by modifying the canLockBlocks user setting via the block_editor_settings_all filter.
To limit block locking by user level, you can use:
function wpfieldwork_admin_only_block_locking($settings, $context) {
  // admin level only
  // change current_user_can to 'delete_others_posts' for editor level+
  $settings['canLockBlocks'] = current_user_can('activate_plugins');
  return $settings;
}
add_filter('block_editor_settings_all', 'wpfieldwork_admin_only_block_locking', 10, 2);
To limit block locking by user ID, you can use:
function wpfieldwork_power_user_block_locking($settings, $context) {
  // replace 1 with ID of user who can lock/unlock
  if ( get_current_user_id() != 1 ) {
    $settings['canLockBlocks'] = false;
  }
  return $settings;
}
add_filter('block_editor_settings_all', 'wpfieldwork_power_user_block_locking', 10, 2);
It’s also possible to control whether a block even allows block locking at all. This is done when registering the block in the block.json file. In the “supports” section of registering a block, set “lock” to false to opt out of a block being lockable.
{
  "name": "sample-block",
  "title": "Sample Block",
  "description": "An example custom ACF block.",
  "category": "formatting",
  "acf": {
    "mode": "preview",
    "renderTemplate": "blocks/sample-block/sample-block.php"
  },
  "supports": {
    "lock": false
  }
}
Defining Post Block Templates & Optional Template Locking
Purpose: Predetermine all or part of a custom post type’s layout and the degree it can be changed
In the pre-Gutenberg days of theme building, a custom post type’s layout was often determined by a mix of HTML and PHP within the theme’s CPT template file. While that’s no longer the case in block-based builds, you can set block templates. Block templates also make it much easier on the client when adding new content as they don’t have to remember which blocks to add in what order every time to keep things consistent.
Post templates can be set when registering the post type by defining template and, optionally, template_lock. Template would contain an array of block names, such as:
'template' => array(
  array('core/heading'),
  array('core/paragraph'),
)
template_lock allows you to either restrict adding and/or moving blocks within a post type’s template. If template_lock is set to “all”, it restricts both or if you only want to restrict adding new blocks, set to “insert.”
What if you want to modify the post template on a custom post type already defined or on a default post or page? No problem! You can do that by modifying the post type object, like:
function wpfieldwork_register_post_template() {
  // change 'post' to type you want to modify
  $post_type_object = get_post_type_object( 'post' );

  // adjust template blocks accordingly
  $post_type_object->template = array(
    array('core/heading'),
    array('core/paragraph'),
  );

  // adjust or remove, as needed
  $post_type_object->template_lock = 'all';
}
add_action('init', 'wpfieldwork_register_post_template');
Allowed (Inner)Blocks
Purpose: Limiting the types of blocks that can be added within any given nested block area
InnerBlocks are nested blocks. When InnerBlocks are called in something like an ACF block template, you have the option to pass an array of blocks to it flagged as allowedBlocks. When doing this, you’re saying that only the noted block types can be nested within this block. For example, the following would restrict this InnerBlocks component to only allow the noted blocks to be used (heading and paragraph, in this case):
<?php // change block names as needed
$allowed_blocks = array('core/heading', 'core/paragraph'); ?>
<InnerBlocks allowedBlocks="<?php echo esc_attr(wp_json_encode($allowed_blocks)); ?>" />
If you want to use InnerBlocks with ACF Blocks, you must set ‘jsx’ to true in your block ‘supports’ when registering the block.
You can also define template and templateLock for InnerBlocks, just like with post templates. You can do so in the post template call with a nested array with the nested blocks defined or as a template and templateLock attribute on the InnerBlocks component itself.
Restricting Block Availability
Purpose: Removing blocks from the editor globally or by content type
Individual users can remove blocks from their view by clicking the 3 dots in the upper right corner of the block editor and going to the Blocks tab under Preferences. However, it is user-specific and is not removing the blocks globally for all users. Occasionally, you may find a use case where you want to completely limit the blocks able to be selected in the editor across the board. You can do this via the allowed_block_types_all hook.
The filter accepts an array of allowed block types and removes anything not on that list.
You can do this globally:
function wpfieldwork_allowed_block_types ($allowed_block_types, $editor_context) {
  // modify block types as needed
  $allowed_block_types = array(
    'core/heading',
    'core/paragraph',
  );
  return $allowed_block_types;
}
add_filter('allowed_block_types_all', 'wpfieldwork_allowed_block_types', 10, 2);
Or by a specific content type, such as:
function wpfieldwork_allowed_block_types ($allowed_block_types, $editor_context) {
  // change 'your_cpt_here' to your CPT name
  if ( 'your_cpt_here' === $editor_context->post->post_type ) {
    // these blocks would be visible in the above CPT
    return array(
      'core/heading',
      'core/paragraph',
    );
  }
  return $allowed_block_types;
}
add_filter('allowed_block_types_all', 'wpfieldwork_allowed_block_types', 10, 2);
Wrapping Up
Hopefully this gives you an idea of different approaches to provide guardrails for your clients within Gutenberg. If you’ve been hesitant about fully embracing the block editor because of lack of control, exploring the options available to you may just change your mind!


